

Needle Felted Simple Bird

Per Bird, you will need:
- 5 of batts in your chosen main colour
- Pinches of one or two contrasting coloured batts
- wisp of brown or black for the beak
- Felting needle (#38 medium)
- Felting Mat
- Scissors
 |
Use your main colour wool. Keep it flat like a sheet and roll it in on itself tucking the sides in to make it about 10cm wide. Keep teasing out the end fibres so you can roll it up for as long as possible. |
 |
Then holding the shape closed, use your medium needle to stab the loose end fibres into the rolled-up up shape to attach them so you can let go of it. |
 |
Now begin to shape your bird by starting with the tail first. Stab your needle as shown in the picture so you bring one side up diagonally giving the tail end a tapered shape. |
 |
Chest and head: Next concentrate the needle stabs on the other side by making this part more rounded. Do not stab too much into the head as we need it to slightly bulge upwards. You will have to stab all over and may find that you tuck in more fibres in other places to get an even look/finish. |
 |
Back: Now make the back of the bird flat by stabbing the needle into the top, evening out any round shapes and fibres that are sticking out. Adjust the tail and head again if it has lost its shape. |
 |
Eyes: Now use your needle and make an indentation where the eyes are going to go. If you are using wool for the eye, felt this into the ‘eye socket’ now. Make two eyes. |
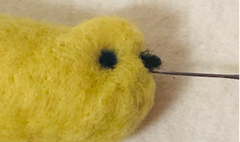 |
Next twizzle a little bit of dark wool in your fingers to make a tiny tapered beak and felt gently into the face of the bird. Cut off any excess fibres with small scissors. |
 |
Now give your bird contrasting wings by felting a thin layer of wool onto its side. Add another bit of contrasting wool if you like. Repeat on the other side. |
 |
You can perch your bird onto a surface as it is, add our wire bird legs or insert a skewer or stick to decorate a plant pot or similar. |
Why not Make-Along with us? |