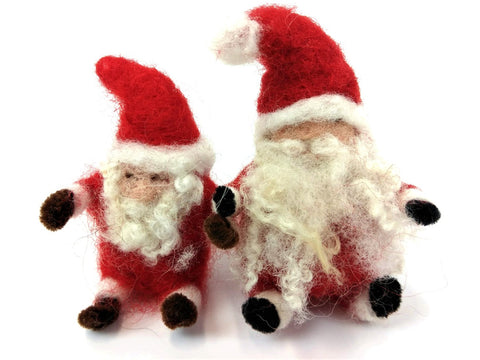
Little poseable Santa

Making these little Santas is fun, quick and easy to do. They measure about 10cm and can be hung on a thread to decorate your Christmas Tree. As they have pipe cleaners running through the hat and body as well as the arms and legs you can give them different poses.
You can read up on techniques using wire armature here if you wish.
You need our black luxury pipe cleaners - 1x per Santa, cut in half for a set of arms and a set of legs as well as 1x extra strong white pipe cleaner for the middle part from hat to the base, about 2-3g of New Zealand Poppy Red wool batts, 1g of curls (the best ones are the Blueface Leicester) for the beard, 1g of New Zealand Flesh Pink wool batts, a tiny, tiny bit of dark brown (try our New Zealand Brown Black wool batts) for the eyes and for the fur trim 1g of our super soft and snow-look-alike Cape Merino wool batts.
For tools you will need: felting mat, medium felting needles (I use the twisted medium needles), scissors to cut the curls and wire cutters.
 |
First take your two black pipe cleaner halves (each 15cm long) and bend the ends in by about 1-2cm. It works well to bend the arms in slightly less and legs slightly more so they are of different lengths. |
 |
Then wrap the red wool as tight as you can flat around the pipe cleaner only leaving the fluffy bent ends exposed. Here in the picture the top set are the legs, the bottom the arms. It is really important to use little wool, let the wool grip into the chenille of the pipe cleaner and imagine it is a ribbon when wrapping it so you are not twisting it. Work with small quantities and build layers. |
 |
Next use the white pipe cleaner and wrap a little red wool into the centre of the pipe cleaner only covering a small area with a thin layer. |
 |
Bend the part that is covered in half and secure the red of the wool around the bend. Cover about 3cm in red but do not build up the layers yet. |
 |
Take your arm pipe cleaner and insert into the two white lengths leaving only about 1-2cm which will become the head. Twist the white pipe cleaner just once above and below the arms therefore trapping and securing these in place. |
 |
Repeat with the legs approximately 2cm below the arms. Twist the white pipe cleaner as before and cut the excess ends off but not too close to the twist. Bend the ends up so they are out of the way and no sharp ends will be exposed. |
 |
Next take a wisp of the flesh pink wool and wrap around the pipe cleaner as you did before just above the arms and below the hat. You can add more layers so that you can now start stabbing the needle gently into the wool to firm it up. It works best to stab the needle along the pipe cleaner so you do not stab into the wire. You can also be mindful when stabbing straight into the pink. |
 |
Once the head is firm use wisps of the red wool and add around the middle of Santa. We now need to fatten him up! |
 |
Add even more red below the crotch so we can shorten the legs. |
 |
Felt down gently (it might hurt Santa) but make the legs more part of the body that way. |
 |
Instead of wrapping wool add small wads of wool and felt down to build up Santa's bum and tummy. |
 |
If need be build up the red on the legs and felt these for the first time. Again, going along the wire protects your needle. |
 |
Add more wool around his shoulders too if required and felt down. We want him to be compact rather than all legs and arms. |
 |
Next take tiny portions of the white cotton-like wool and lay around the hem of the trousers. Felt down by first stabbing the needle into the top of the white to create a clear contrasting line. Then stab into the white from the base up. If you still need to shape it make little stabs straight into the white wool. Add more if needed. |
 |
Repeat this on his cuffs too. Then give him indentations for eyes and a mouth by concentrating the needle in one spot. |
 |
Add a tiny, tiny bit of the brown black wool into the eyes, more like slits than round eyes,so he looks like he is laughing. |
 |
Then take the curls and select a nice bunch to fit around the base of Santa's face and up towards the ears. If you need to separate the curls it is best to cut them rather than pull them (you will only pull the curl out and they will become frizzy). |
 |
Then take a small wisp of curls and roll between your fingers in the centre to create a moustache. Felt down above his mouth and only fasten in the centre. |
 |
Now work on his hat. Instead of wrapping the wool around the pipe cleaner, use a small batch of the red and lay it onto the hat from the forehead up towards the top of the hat. Felt this down and at the same time fold the hat that sits on his forehead in so you create a neat edge. |
 |
Repeat this process around the whole hat. Be careful not to stab the wire! |
 |
Then, as before, add the white fluffy wool to make a fur trim. Use the same technique as with the arms and legs. You should just be able to see the eyes peeking out. |
 |
Lastly add a white bobble to the top of the hat. Be careful as there is little wool to felt into. Shallow little stabs will be best. |
 |
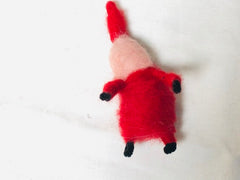
This how your Santa will look from the back. |